Create a Cutting Wood Text Effect in Photoshop
In this tutorial, you will learn to create a wood text effect in Photoshop without using any effects. This is a short and easy tutorial and the results are amazing. After watching this tutorial you will be creating your own wood text effect in photoshop. This is 100% editable and looks so realistic engraved wood text effect. We are going to create this effect from the scratch. You only need to download the wood texture image.
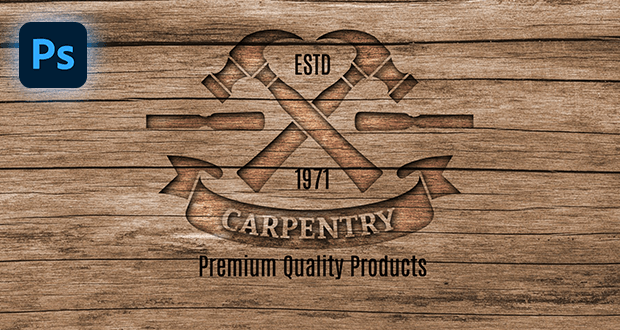
Here’s the effect we’re going to create.
Let’s get started!
Step 1: Open Adobe Photoshop. Go to the File menu then import the wood texture background.
Step 2: Then create a new layer just above the image layer. Then convert it to a smart object. Rename the newly created layer to Text or whatever name you like.
Step 3: Double-click the Text layer. Select the horizontal type tool and add your text. Increase the font size, then align your text to the center. Change the font color to white then go to the File menu, and click SAVE.
Step 4: Change the image layer mode from normal to multiply. Double-click the image layer to open the blending options.
Bevel & Emboss Settings:
Change the Technique to Chisel Hard. Depth to 75%. Size to 13px, soften to 16px. Gloss Contour settings. Highlight mode to Color Dodge. Opacity to 30%. Shadow mode opacity to 100%.
Inner Shadow Settings:
Set the opacity to 100%. Distance to 10px. Choke to 10%. Size to 35px.
Color Overlay Settings:
Change the blend mode to overlay. Color to Black. Set the opacity to 35%.
Gradient Overlay Settings:
The blend mode to Multiply. Opacity to 12%. The gradient to black (10%), White (90%). Change the style to Linear.
Then we are done! Double click the logo or Text layer, import your logo to the screen, then go to the File menu and select SAVE.
Subscribe to the RizatGraphics YouTube channel for more interesting Motion Graphics and Graphic Design tutorials.
Here you can download the 100% free .PSD file