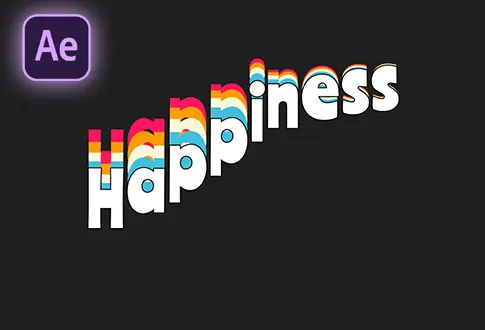
Shape Text Animation in Adobe After Effects
It’s free and I will continue to give out free downloads!
Make your text look awesome with a Shape Text Animation in Adobe After Effects! In this quick and simple tutorial, I’ll guide you through creating a cool text animation using shapes. It’s easy to follow, so I suggest watching the whole video to get the hang of it. By the end, you’ll know how to make your text stand out with a stylish shape text animation. Enjoy the tutorial, and let’s make your text look amazing together! You might also be interested in this tutorial on Wave Text Animation in After Effects.
Step-by-Step Guide to Creating Shape Text Animation:
Step 1: Set Up Composition
- Open Adobe After Effects.
- Create a new composition and rename it to “Shape Text” (or any name you prefer).
- Set the resolution to 1920×1080 pixels, frame rate to 30 frames per second, and duration to 10 seconds.
Step 2: Add and Align Text
- Select the Text tool from the toolbar.
- Type your desired text and align it to the center of the composition.
Step 3: Create Shape Layers
- Select the Pen tool from the toolbar.
- Set the Fill color to None and the Stroke color to a solid color with a stroke width of 25 pixels.
- Click outside the text layer and start creating shapes around each character of the text.
Step 4: Adjust Shape Layers
- Create separate shapes for each character of the text.
- Rename the shape layers according to the characters they cover.
- Select all shape layers and increase the stroke width to cover the entire text.
Step 5: Add Trim Paths
- Select any shape layer and go to its properties.
- Add the Trim Paths effect.
- Open the Trim Paths options and click the Start Stopwatch icon to add a keyframe.
- Set the End value to 0% at the beginning.
- After two seconds, change the End value to 100%.
Step 6: Apply Easy Ease
- Select both keyframes in the Trim Paths options.
- Right-click and go to Keyframe Assistant, then choose Easy Ease.
Step 7: Copy Trim Paths Keyframes
- Select both keyframes in the Trim Paths options.
- Press Control + C to copy the keyframes.
- Select the remaining shape layers and press Control + V to paste the keyframes. This applies the same Trim Paths animation to all layers.
Step 8: Pre-compose Shape Layers
- Select all shape layers.
- Right-click and choose Pre-compose.
- Rename the pre-comp to “Text Shapes.”
Step 9: Apply Track Matte
- Select the Text layer.
- Go to the Track Matte options and choose Alpha Matte (Text Shapes). This will use the “Text Shapes” pre-comp as a track matte for the text layer.
Step 10: Preview and Export
Preview the animation by playing the timeline. If you’re satisfied with the result, you can export the composition to your desired format.
This tutorial demonstrates how to create a shape text animation using shape layers, Trim Paths, and track matte in Adobe After Effects. Adjust the shape designs, animation timing, and other parameters to customize the visual effect of your shape text animation.
Project File Details:
| Updated | September 16, 2024 |
| Compatibility | After Effects CC |
| Required Plugin | No |
| Size | 80 KB |
| Price | Free |